Tech-stuff
This is probably my favourite bit coz I get to show off loads of useless information.
Dragpipes
I found running mutes stuffed up the exhausts of my Harley choked it to death, so I run open pipes.
The problem with running open pipes (noise, what noise??) is the loss of mid-range power
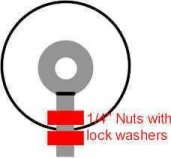
I picked up this snippet on the net somewhere. Get a 3/4 O/D washer and weld it to the head
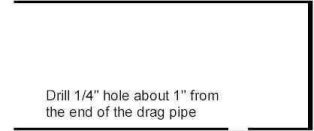
of a 1/4 bolt (I suppose metric equivalents will work), drill a 1/4 hole 1 inch from the end of the
pipe and bolt it in with a couple of lock nuts. Now the washers can be rotated to alter the back
pressure and allow you to fine tune. Apparently Harleys are best with the washer at 90 degrees
to the exhaust flow (ie max back pressure)
This is supposed to be an old Honda factory works trick
that works on Harleys (and who knows what else?)
. I haven't tried it yet but will next summer, with luck. Any more info would
be appreciated
23/4/00 NOTE:- I've now made a pair of these using M10 washers, and fitted them.
I'll report any improvement (or otherwise) in a couple of weeks when I've put some miles on.
31/4/00 :- I've just come back from a longish run over the weekend and my initial impressions
are that the mid range torque has improved, I have no way of measuring this or proving it, but I won't
be removing this mod yet.
30/7/00:- I'm convinced now, this is the cheapest, easiet and most effective thing to get rid of that
midrange flat spot (doesn't spoil the sound either)
Suspension
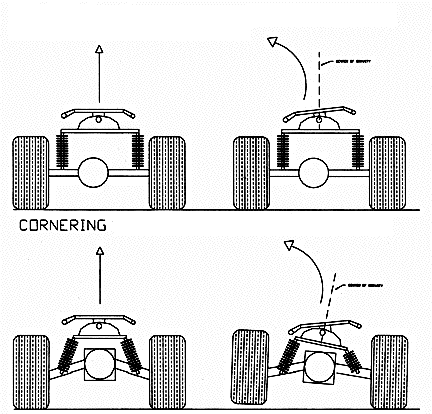
Trike rear suspension falls into two categories, live axle and independent.
Live axle suspension means the wheel hubs are bolted solidly to a single axle
With this system, when one wheel hits a bump, both wheels are affected.
With independent suspension when one wheel hits a bump that force is not transmitted
to the opposite wheel. This design provides a more comfortable ride at low
speeds.
Different suspension systems have different advantages and disadvantages. In this
case the trade-off is low speed ride for high-speed handling. Independent
suspensions work well on a car because it has two wheels at the front to stabilize
the car in corners, unlike a trike.
When the rear wheel of a trike hits a bump at low speed, the reaction of
the suspension will pitch the trike up on one side, causing rough ride. Independent
suspension handles this job well and gives a superior ride at low
speeds. As speed increases, the inertial effect of the rotating wheels make
it difficult for the bike to be thrown off line (which is why your motorcycle
does not simply fall over at speed). At this point (approx. 25 mph) the
rear swingarm begins to move up and down in unison and the ride becomes
increasingly smooth and more stable. The advantages of independent suspension
are lost. This is also the time that the disadvantages of independent suspension
begin to appear.

The difficulty comes in cornering. When a unit with independent suspension
enters a corner, the same independent action that provides a smooth low
speed ride allows the trike to lean the wrong way in the turn. When the
trike leans right, it wants to go right, and you are trying to force it
left into a left corner. This is manageable in low speed turns buts gets
progressively more dangerous as cornering gets more aggressive. Cars with
independent suspension also lean the wrong way in the corners, but are stabilized
by the outside front wheel, if you have ever driven a Reliant Regal you will know
all about this!! (not that the plastic pig has IRS it just feels that way, in fact everything
feels a bit independent in a Reliant)
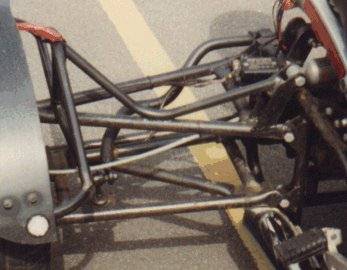
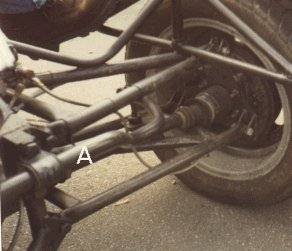
Detail of IRS rear end note size of roll bar used. (marked "A" on 2nd pic)
I cribbed most of this article from the Trikes'R' Us site, now gone.
Copper Gaskets
Before using copper gaskets they should be annealed.
To anneal copper it should be warmed up until it goes cherry red and then quenched to cool
it quickly, Now most people use water to quench, but if you use methylated spirits you will get
a much better finish. There is a possibility that the meths will catch fire, but it is quickly put out
by smothering (or drinking, if you're that way inclined).
Gearing
One of the problems I have come across is getting the gearing right, working out the right
combination of sprockets, diff ratios and wheel/tyre sizes has been a real headache.
What you need to know is the original overall engine revs to roadspeed ratio of the donor bike
and to get as
near as possible to this on your Trike. This is usually expressed as so many miles per hour per
1000 rpm in top gear. I had this wrong at one time and had my Trike overgeared and suffered a
a load of clutch slipping and overheating problems. A mate of mine has a CX500 Trike with a ford
axle + 13" wheels, and it revs it's nuts off at 70mph.
You need to find out how many times the engine turns for one revolution of the back wheel
and work out how many time the wheel goes round in a mile. All a pain in the arse really.
Reliant axles
A .PDF of the Reliant axle.